Generate
Create images with AI
Embroidery Starter Guide for Beginners
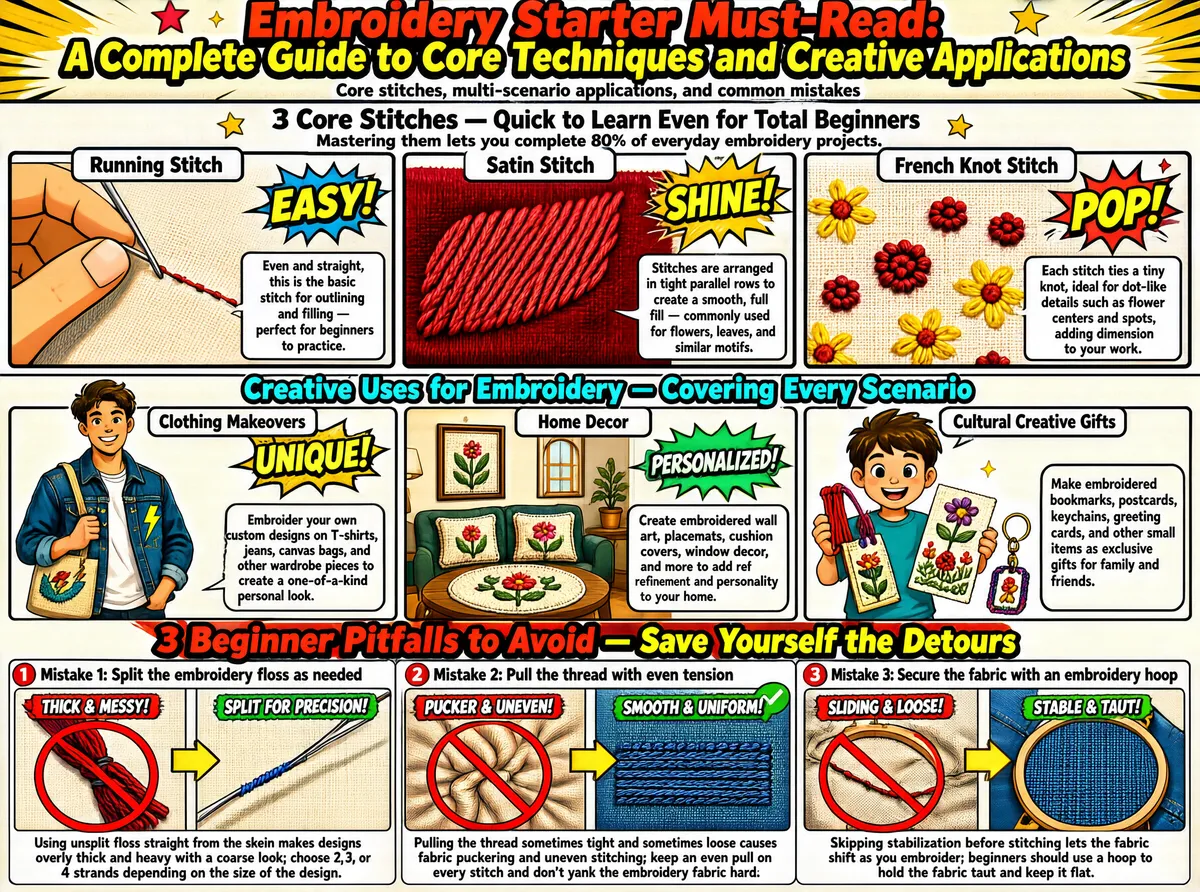
This infographic is presented in a comic style, themed "Embroidery Starter Must-Read: A Complete Guide to Core Techniques and Creative Applications," aimed at helping total beginners quickly master embroidery basics and expand their creative ideas. It uses a block-based overall layout with vivid colors, featuring plenty of dynamic lines and speech-bubble elements to enhance visual impact and readability. The title sits at the top center in bold sans-serif lettering, with a subtitle beneath it noting that the content covers core stitches, multi-scenario applications, and common mistakes. The infographic is divided into three main parts: Part 1: "3 Core Stitches — Quick to Learn Even for Total Beginners," emphasizing that mastering them lets you complete 80% of everyday embroidery projects. This part contains three side-by-side comic panels, each showing one stitch: - **Running Stitch** (EASY!): The illustration shows a hand guiding needle and thread along a dashed-line path in a straight seam, with the note "Even and straight, this is the basic stitch for outlining and filling — perfect for beginners to practice." - **Satin Stitch** (SHINE!): The illustration shows stitches laid in parallel rows across a red velvet-like fabric, forming a smooth, plump filled effect, with the note "Stitches are arranged in tight parallel rows to create a smooth, full fill — commonly used for flowers, leaves, and similar motifs." - **French Knot Stitch** (POP!): The illustration shows knots tied in the fabric to form small dots, surrounded by small yellow flowers, with the note "Each stitch ties a tiny knot, ideal for dot-like details such as flower centers and spots, adding dimension to your work." Part 2: "Creative Uses for Embroidery — Covering Every Scenario," presenting different application directions through three scenario-based comic panels: - **Clothing Makeovers** (UNIQUE!): A man wears a denim jacket and canvas bag embroidered with lightning-bolt motifs, with the note "Embroider your own custom designs on T-shirts, jeans, canvas bags, and other wardrobe pieces to create a one-of-a-kind personal look." - **Home Decor** (PERSONALIZED!): A living-room scene showing framed embroidery on the wall, cushions with embroidered flowers, table mats, and more, with the note "Create embroidered wall art, placemats, cushion covers, window decor, and more to add refinement and personality to your home." - **Cultural Creative Gifts**: A boy holds small embroidered items such as bookmarks, postcards, and keychains, with the note "Make embroidered bookmarks, postcards, keychains, greeting cards, and other small items as exclusive gifts for family and friends." Part 3: "3 Beginner Pitfalls to Avoid — Save Yourself the Detours," listing three common mistakes along with the correct approach, each including a wrong example and a right example: - **Mistake 1: Split the embroidery floss as needed** Wrong illustration: a thick strand threaded directly through the needle, labeled "THICK & MESSY!" with a prohibition symbol. Right illustration: a female character separates the strand into several plies, with a speech bubble reading "SPLIT FOR PRECISION!". Note: "Using unsplit floss straight from the skein makes designs overly thick and heavy with a coarse look; choose 2, 3, or 4 strands depending on the size of the design." - **Mistake 2: Pull the thread with even tension** Wrong illustration: a puckered fabric surface with uneven stitches, labeled "PUCKER & UNEVEN!" with a prohibition symbol. Right illustration: flat fabric with even stitches, labeled "SMOOTH & UNIFORM!". Note: "Pulling the thread sometimes tight and sometimes loose causes fabric puckering and uneven stitching; keep an even pull on every stitch and don't yank the embroidery fabric hard." - **Mistake 3: Secure the fabric with an embroidery hoop** Wrong illustration: slack fabric sliding around, labeled "SLIDING & LOOSE!" with a prohibition symbol. Right illustration: fabric held tight in a round embroidery hoop, labeled "STABLE & TAUT!". Note: "Skipping stabilization before stitching lets the fabric shift as you embroider; beginners should use a hoop to hold the fabric taut and keep it flat." The infographic as a whole adopts a comic-panel structure where each section stands alone yet flows logically together. Text and images are tightly integrated, the language is plain and easy to understand, and it is both educational and fun — a perfect quick-start guide for embroidery beginners.
Tags
More Images